 PRINTING ON CLAY
There are many methods one can use to print on clay, but this is one our class found that has been successful for us.
We experimented with various ink recipes and different ways of putting the " ink" on clay. Our teacher Kathy made many test tiles and made notations on each. It was truly a trial and error process. That is what I love about art, the process of experimentation. In the first to photo's Kathy is selecting a xerox image for her pottery. All the images we use are either royalty free or our own drawings and photo's.

 Supplies you will need:
1) xerox image
2) "clay ink"
3) brayer
4) 2 plastic bowls of water
5)newspaper
6)rubber gloves
7)small sponges

1)Choose your image, cutting off excess paper, but leaving a good half inch.
 2) Apply a teaspoon or more of gum of arabic solution to the glass.
3) Put your image on top of the wet area image facing upwards.
4) Rub the excess gum solution over top of image.
5) Take sponge and wipe around image removing excess gum solution
5) Apply ink to brayer and roll on to image. It is best to roll in one direction and then repeat rolling in the opposite direction.
6) Using a small sponge with water softly dab the image until ink is removed. It may take several times.
7) Repeat three times, apply ink and removing
8) After the last application carefully put image on clay that has been allowed to dry slightly, not quite leather hard. The clay must be moist enough to absorb the ink.
9) Now burnish lightly with a spoon and allow to dry
10) burnish again lightly and remove.
 The ink will be very smudgy until the clay is fired, so be careful touching and handling during this phase.
Clean the water often. One bowl should have a teaspoon of gum solution and clean sponges. The other bowl will be for the inking and re-inking process. This is a very messy process so rubber gloves keep your hands clean while you work with the ink.


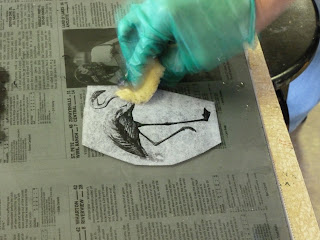


 One of the things that one must be careful about is rolling on the ink. It is easy with small images for them to just roll on to the roller and then it is tricky to get them off in one piece.
Dabbing the image softly many times removes the ink, until you are ready to re-ink and then finally apply it your clay piece.
In this image Kathy is placing her picture on her pottery piece being careful to leave
space for other images.
In the photo to the left Kathy is burnish the back of the photo with a metal spoon.
A plastic spoon will work also.
Judy is one of my classmates who is trying the process for the first time with great success.
I will post the exact "clay ink" formula for you in the next post. You will need gum solution, linseed oil and a ceramic powder. The ink needs to be made 48 hours ahead of time. After the initial mixing of the ingredients, the ink must be repeatedly shaken for 20 minutes. Putting small marbles or pebbles inside the jar helps to mix the ink better. Once made the ink must be used and not saved more that a couple of days or it will crystalize.


 Printing Images on Clay


